Introduction
This is the 1st part of this series, where I am going to explain how to create a User Registration page using asp.net MVC.You know, Dotnet awesome is a platform to learn, read and explore contents related to web development. Here in this series "Implement basic functionality in asp.net MVC application", I have explained how to create some very basic functionality like create a registration page, login page, file upload page etc., especially for beginners.
I have explained following articles in the series "Implement basic functionality in asp.net MVC application"
- How to create a User Registration page using asp.net mvc
- How to create a login page using asp.net mvc
- How to create career page with Upload file (CV) in MVC
- How to create Feedback page with cascade dropdownlist in MVC.
- How to display database data in webgrid in mvc
Steps :
Step - 1: Create New Project.
Go to File > New > Project > Select asp.net MVC4 web application > Entry Application Name > Click OK > Select Internet Application > Select view engine Razor > OKStep-2: Add a Database.
Go to Solution Explorer > Right Click on App_Data folder > Add > New item > Select SQL Server Database Under Data > Enter Database name > Add.Step-3: Create table for Save data.
Open Database > Right Click on Table > Add New Table > Add Columns > Save > Enter table name > Ok.In this example, I have used one table as below

Step-4: Add Entity Data Model.
Go to Solution Explorer > Right Click on Project name form Solution Explorer > Add > New item > Select ADO.net Entity Data Model under data > Enter model name > Add.A popup window will come (Entity Data Model Wizard) > Select Generate from database > Next >
Chose your data connection > select your database > next > Select tables > enter Model Namespace > Finish.
Step-5: Apply validation on model.

- using System.ComponentModel.DataAnnotations;
- using System.Web.Mvc;
- public partial class User
- {
- public int UserID { get; set; }
- [Required(ErrorMessage="Please provide username", AllowEmptyStrings=false)]
- public string Username { get; set; }
- [Required(ErrorMessage="Please provide Password", AllowEmptyStrings=false)]
- [DataType( System.ComponentModel.DataAnnotations.DataType.Password)]
- [StringLength(50,MinimumLength=8, ErrorMessage="Password must be 8 char long.")]
- public string Password { get; set; }
- [Compare("Password", ErrorMessage = "Confirm password dose not match.")]
- [DataType(System.ComponentModel.DataAnnotations.DataType.Password)]
- public string ConfirmPassword { get; set; }
- [Required(ErrorMessage="Please provide full name", AllowEmptyStrings=false)]
- public string FullName { get; set; }
- [RegularExpression(@"^([0-9a-zA-Z]([\+\-_\.][0-9a-zA-Z]+)*)+@(([0-9a-zA-Z][-\w]*[0-9a-zA-Z]*\.)+[a-zA-Z0-9]{2,3})$",
- ErrorMessage="Please provide valid email id")]
- public string EmailID { get; set; }
- }
Step-6: Create a Controller .
Go to Solution Explorer > Right Click on Controllers folder form Solution Explorer > Add > Controller > Enter Controller name > Select Templete "empty MVC Controller"> Add.Here I have created a controller "UserController"
Step-7: Add new action into your controller for Get Method
Here I have added "Register" Action into "User" Controller. Please write this following code
- public class UserController : Controller
- {
- public ActionResult Register()
- {
- return View();
- }
- }
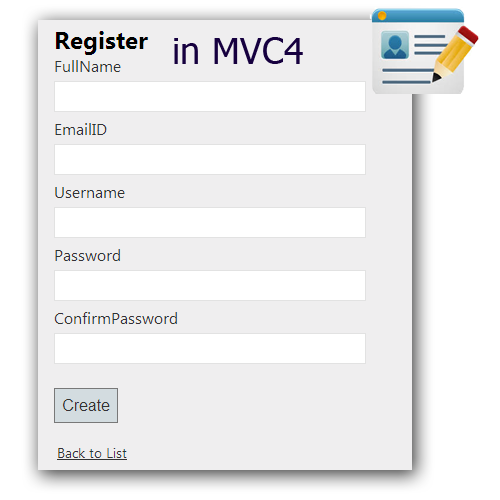
Step-8: Add view for your Action (Register) & design for creating a Register form.
Right Click on Action Method (here right click on Register action) > Add View... > Enter View Name > Select View Engine (Razor) > Check "Create a strong-typed view" > Select your model class > Add.HTML Code
- @model MVCRegistration.User
- @using (Html.BeginForm()) {
- @Html.ValidationSummary(true)
- <fieldset>
- <legend>User</legend>
- @Html.AntiForgeryToken()
- @if (ViewBag.Message != null)
- {
- <div style="border:solid 1px green">
- @ViewBag.Message
- </div>
- }
- <div class="editor-label">
- @Html.LabelFor(model => model.FullName)
- </div>
- <div class="editor-field">
- @Html.EditorFor(model => model.FullName)
- @Html.ValidationMessageFor(model => model.FullName)
- </div>
- <div class="editor-label">
- @Html.LabelFor(model => model.EmailID)
- </div>
- <div class="editor-field">
- @Html.EditorFor(model => model.EmailID)
- @Html.ValidationMessageFor(model => model.EmailID)
- </div>
- <div class="editor-label">
- @Html.LabelFor(model => model.Username)
- </div>
- <div class="editor-field">
- @Html.EditorFor(model => model.Username)
- @Html.ValidationMessageFor(model => model.Username)
- </div>
- <div class="editor-label">
- @Html.LabelFor(model => model.Password)
- </div>
- <div class="editor-field">
- @Html.EditorFor(model => model.Password)
- @Html.ValidationMessageFor(model => model.Password)
- </div>
- <div class="editor-label">
- @Html.LabelFor(model => model.ConfirmPassword)
- </div>
- <div class="editor-field">
- @Html.EditorFor(model => model.ConfirmPassword)
- @Html.ValidationMessageFor(model => model.ConfirmPassword)
- </div>
- <p>
- <input type="submit" value="Create" />
- </p>
- </fieldset>
- }
- <div>
- @Html.ActionLink("Back to List", "Index")
- </div>
- @section Scripts {
- @Scripts.Render("~/bundles/jqueryval")
- }
Step-9: Add new action into your controller for POST Method (for Register)
Here I have added "Register" Action with Model Parameter (here "User") into "User" Controller. Please write this following code
- [HttpPost]
- [ValidateAntiForgeryToken]
- public ActionResult Register(User U)
- {
- if (ModelState.IsValid)
- {
- using (MyDatabaseEntities dc = new MyDatabaseEntities())
- {
- //you should check duplicate registration here
- dc.Users.Add(U);
- dc.SaveChanges();
- ModelState.Clear();
- U = null;
- ViewBag.Message = "Successfully Registration Done";
- }
- }
- return View(U);
- }
Step-10: Run Application.
Download Application Live Demo
If you are working on AngularJS application and wants to create a registration page in angularjs with asp.net mvc as server side, this link will be useful to you how to create simple registration form with validation using angularjs and asp.net mvc.