Introduction
In one of my previous post, I have explained how to update multiple rows at once Using MVC 4 and EF (Entity framework).Today I will show you how to insert multiple rows to the database using asp.net MVC4. One of the common problems I have seen is to bulk data insert to an SQL Server database at a time using ASP.Net MVC4 Application with add new record and remove option dynamically. Here in this post, I have done this easily following these simple steps.If you have asp.net webforms project, please visit how to insert bulk data (multiple rows) to a SQL Server database using ASP.NET and for update multiple rows at once in asp.net webforms visit how to Update bulk data (multiple rows) to a SQL Server database using ASP.NET
Steps :
Step - 1: Create New Project.
Go to File > New > Project > Select asp.net MVC4 web application > Entry Application Name > Click OK > Select Internet Application > Select view engine Razor > OK
Step-2: Add a Database.
Go to Solution Explorer > Right Click on App_Data folder > Add > New item > Select SQL Server Database Under Data > Enter Database name > Add.Step-3: Create table for save data.
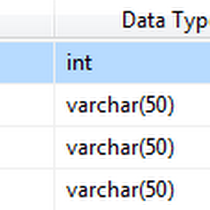
Open Database > Right Click on Table > Add New Table > Add Columns > Save > Enter table name > Ok.
In this example, I have used one table as below
Step-4: Add Entity Data Model.
Go to Solution Explorer > Right Click on Project name form Solution Explorer > Add > New item > Select ADO.net Entity Data Model under data > Enter model name > Add.A popup window will come (Entity Data Model Wizard) > Select Generate from database > Next >
Chose your data connection > select your database > next > Select tables > enter Model Namespace > Finish.
Step-5: Apply Validation On Model.
Open your model and add validation. Please follow below code
- namespace MVCAjaxSave
- {
- using System;
- using System.Collections.Generic;
- using System.ComponentModel.DataAnnotations;
- public partial class ContactInfo
- {
- public int ID { get; set; }
- [Required(ErrorMessage = "Contact Name required!", AllowEmptyStrings = false)]
- public string ContactName { get; set; }
- [Required(ErrorMessage = "Contact No required!", AllowEmptyStrings = false)]
- public string ContactNo { get; set; }
- }
- }
Step-6: Add a new Controller.
Go to Solution Explorer > Right Click on Controllers folder form Solution Explorer > Add > Controller > Enter Controller name > Select Templete "empty MVC Controller"> Add.Step-7: Add new action into your controller for save data.
Here I have added "BulkData" Action into "Save" Controller. Please write this following code
- public ActionResult BulkData()
- {
- // This is only for show by default one row for insert data to the database
- List<ContactInfo> ci = new List<ContactInfo> {new ContactInfo{ ID = 0, ContactName = "", ContactNo=""} };
- return View(ci);
- }
Step-8: Add view for the Action & design.
Right Click on Action Method (here right click on form action) > Add View... > Enter View Name > Select View Engine (Razor) > Check "Create a strong-typed view" > Select your model class > Add.[N:B:Please Rebuild solution before add view.]
Step-9: Add jquery code for save data to the server.
Jquery CodeComplete View
- @section Scripts{
- @Scripts.Render("~/bundles/jqueryval")
- <script language="javascript">
- $(document).ready(function () {
- //1. Add new row
- $("#addNew").click(function (e) {
- e.preventDefault();
- var $tableBody = $("#dataTable");
- var $trLast = $tableBody.find("tr:last");
- var $trNew = $trLast.clone();
- var suffix = $trNew.find(':input:first').attr('name').match(/\d+/);
- $trNew.find("td:last").html('<a href="#" class="remove">Remove</a>');
- $.each($trNew.find(':input'), function (i, val) {
- // Replaced Name
- var oldN = $(this).attr('name');
- var newN = oldN.replace('[' + suffix + ']', '[' + (parseInt(suffix) + 1) + ']');
- $(this).attr('name', newN);
- //Replaced value
- var type = $(this).attr('type');
- if (type.toLowerCase() == "text") {
- $(this).attr('value', '');
- }
- // If you have another Type then replace with default value
- $(this).removeClass("input-validation-error");
- });
- $trLast.after($trNew);
- // Re-assign Validation
- var form = $("form")
- .removeData("validator")
- .removeData("unobtrusiveValidation");
- $.validator.unobtrusive.parse(form);
- });
- // 2. Remove
- $('a.remove').live("click", function (e) {
- e.preventDefault();
- $(this).parent().parent().remove();
- });
- });
- </script>
- }
- @model List<MVCBulkInsert.ContactInfo>
- @{
- ViewBag.Title = "Insert Bulk Data";
- }
- <style>
- td {
- padding:5px;
- }
- </style>
- <div style="width:700px; padding:5px; background-color:white;">
- @using (Html.BeginForm("BulkData","Save", FormMethod.Post))
- {
- @Html.AntiForgeryToken()
- @Html.ValidationSummary(true)
- if (ViewBag.Message != null)
- {
- <div style="border:solid 1px green">
- @ViewBag.Message
- </div>
- }
- <div><a href="#" id="addNew">Add New</a></div>
- <table id="dataTable" border="0" cellpadding="0" cellspacing="0">
- <tr>
- <th>Contact Name</th>
- <th>Contact No</th>
- <th></th>
- </tr>
- @if (Model != null && Model.Count > 0)
- {
- int j = 0;
- foreach (var i in Model)
- {
- <tr style="border:1px solid black">
- <td>@Html.TextBoxFor(a=>a[j].ContactName)</td>
- <td>@Html.TextBoxFor(a=>a[j].ContactNo)</td>
- <td>
- @if (j > 0)
- {
- <a href="#" class="remove">Remove</a>
- }
- </td>
- </tr>
- j++;
- }
- }
- </table>
- <input type="submit" value="Save Bulk Data" />
- }
- </div>
- @* Here I will add Jquery Code for validation / dynamically add new rows / Remove rows etc *@
- @section Scripts{
- @Scripts.Render("~/bundles/jqueryval")
- <script language="javascript">
- $(document).ready(function () {
- //1. Add new row
- $("#addNew").click(function (e) {
- e.preventDefault();
- var $tableBody = $("#dataTable");
- var $trLast = $tableBody.find("tr:last");
- var $trNew = $trLast.clone();
- var suffix = $trNew.find(':input:first').attr('name').match(/\d+/);
- $trNew.find("td:last").html('<a href="#" class="remove">Remove</a>');
- $.each($trNew.find(':input'), function (i, val) {
- // Replaced Name
- var oldN = $(this).attr('name');
- var newN = oldN.replace('[' + suffix + ']', '[' + (parseInt(suffix) + 1) + ']');
- $(this).attr('name', newN);
- //Replaced value
- var type = $(this).attr('type');
- if (type.toLowerCase() == "text") {
- $(this).attr('value', '');
- }
- // If you have another Type then replace with default value
- $(this).removeClass("input-validation-error");
- });
- $trLast.after($trNew);
- // Re-assign Validation
- var form = $("form")
- .removeData("validator")
- .removeData("unobtrusiveValidation");
- $.validator.unobtrusive.parse(form);
- });
- // 2. Remove
- $('a.remove').live("click", function (e) {
- e.preventDefault();
- $(this).parent().parent().remove();
- });
- });
- </script>
- }
Step-10: Add another action into your controller for Save Data to the server.
Here I have added "BulkData" Action into "Save" Controller for POST Action. Please write this following code
- [HttpPost]
- [ValidateAntiForgeryToken]
- public ActionResult BulkData(List<ContactInfo> ci)
- {
- if (ModelState.IsValid)
- {
- using (MyDatabaseEntities dc = new MyDatabaseEntities())
- {
- foreach (var i in ci)
- {
- dc.ContactInfoes.Add(i);
- }
- dc.SaveChanges();
- ViewBag.Message = "Data successfully saved!";
- ModelState.Clear();
- ci = new List<ContactInfo> { new ContactInfo{ ID = 0, ContactName = "", ContactNo= ""} };
- }
- }
- return View(ci);
- }
Step-11: Run Application.